May 18, 2009

Needle Felted Postcards

These postcards started with a piece of gray wool that somebody put on the free table at our guild meeting. It was the perfect background for these needle felted postcards for the Surface Design group "Anything but Cotton" trade.


I worked on these while we were visiting our daughter in Evanston, IL. It was the perfect travel project. The front is made with wool roving and decorated with beads, the back has painted Lutrador. I hope the recipients enjoy receiving them as much as I enjoyed making them.

May 17, 2009

Postcards Received

I received three wonderful postcards in the "Anything but Cotton" trade from the Surface Design group. What material(s) do you think I used to make my postcards?My camera didn't capture the iridescent quality of this postcard. Annette used polyester brocade and velvet.
Jan made this luscious postcard from silk, wool, and a variety of yarn.
Tracy couched a lot of yarn onto a background and painted it with metallic paint. Unfortunately, I wasn't able to capture the shimmery gold paint on this postcard.
A huge thank you to my trading partners, it was a fun trade. My postcards are finished and will be mailed tomorrow. I was a bit distracted during the wildfire and was a bit late getting my postcards finished. I'll show them to you next post.
I was going to take a workshop with B. J. Adams, but I ran out of vacation days, so had to back out of the class. So, I decided to try some of the FME techniques that she uses on my own. This little tree is thread painted on a tulle background. I like the way the tree looks, but I'm not thrilled with the tulle. Next time, I will use a water or heat dissolving stabilizer.
I think this would be classified as thread drawing. It's pretty quick and easy. I can see this technique being used with quilting designs too. Both techniques could be quite useful, so I'll stick them into my bag of tricks.

May 12, 2009

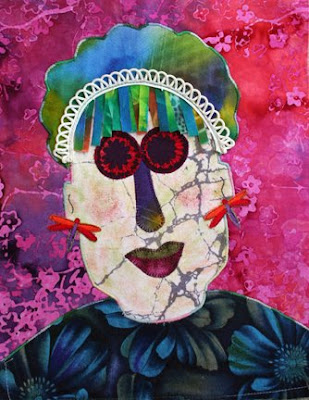
Funny Face

Here's my newest Funny Face. I just love making these! I think it might be impossible to look at it without smiling.
The idea is to turn the left brain off and let the right brain take over, in other words, create intuitively. It's all about having fun. I didn't intend for the portrait to resemble anyone in particular, but I've already heard two comments about how much it resembled an un-named relative.
I've got a lot of embellishment to do, but I thought you might enjoy seeing it in progress.

This piece was made using leftovers from other projects. I pulled random pieces out of my scrap basket and attached them to a muslin foundation. Once the pieces were arrange to my liking, I quilted the top to muslin and batting. I stitched along all the edges and turned the piece right side out. Some hand stitching and embellishment is already underway.

May 11, 2009

PhotoEZ Screenprints

Wow . . . I can't believe it's been over a month since I last posted. Where does the time go?
Here's some of the printed fabric I made using the PhotoEZ screens I made from bubble wrap. As predicted, both samples printed great. The red sample looks pretty similar to how real bubble wrap would print. This sample shows the Photoshop manipulated outline of bubble wrap. I really like the way this one turned out, it will add a wonderful layer of texture and it's very unique.The graphics for this last screen was made in Illustrator by manipulating the letter"o". I'm involved in an alphabet challenge, and this is one of my experiments. I'm not sure if I'll use it, but I enjoyed playing with letters.

As many of you know, there have been a lot of wildfires around my house in the last couple of years. Unfortunately, we're having another one, the Jesusita fire! This fire quickly spread through the hills of three neighboring cities, Goleta (where I live), Santa Barbara, and Montecito. Over 30,000 people were evacuated and another 15,000 were in the evacuation warning area. The winds blew embers up to 1/2 mile away and would start another fire. Needless to say, it was horrific. Nobody was safe. I've never been so grateful to see the fog roll in.

The last report I heard said it was 65% contained, and as long as the Santa Ana winds don't blow tonight, we should be fine. I think 80 houses were completely destroyed and 20 or so damaged. I was packed, but didn't get evacuated. Many of my friends were evacuated, but all of them are safe and none of their houses were burned.

Firefighters from all over the surrounding states came to put this fire out. I am in total awe of these brave individuals, they are true heroes.

I guess I'll get my sewing machine out of the car, I need to finish some postcards for an Anything but Cotton trade for the Surface Design Yahoo Group.

April 7, 2009

Love My Bubble Wrap

I've used bubble wrap many times to print on fabric or paper. It is one of the easiest background textures that I've found. In order to get the best texture, you should pop the large bubbles; it doesn't seem to make a difference with the small bubbles.

While trying to figure out a new way to use bubble wrap, I had one of those "What If" moments. I decided to put the bubble wrap directly on the scanner to see what would happen. The scan has some interesting textures, but the ink coverage would be really thick. I proceeded to play in Photoshop until I came up with the next example.Hmmm . . . I like! I think this one will make a nice print, but . . . I decided to take it even further.

Wow, very cool. I decided to make a PhotoEZ screen of the last two examples. I haven't had a chance to print with them yet, but I think (hope) they are going to look great. In the past, I made a couple of screens that just didn't look good when printed, they ended up looking mushy. At this point, I've accumulated a pretty extensive set of PhotoEZ and Thermofax screens; you would think I could tell ahead of time, but I still can't be sure what the final results will like.

Which one do you think will look best when printed?

April 4, 2009

Colorful Circles

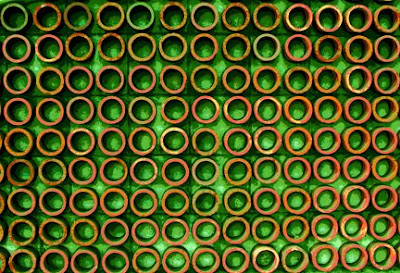
I've been meaning to post the quilt that Jean Morrison made for me as part of the Blockhead exchange. The inspiration I provided was a photo that I took of some clay circles (my favorite shape) attached to a wall. The original photo was pretty interesting . . . but I still had to to play with it to improve the colors. Here's what it looked like when I was finished.And here is the quilt that Jean made for me. Wow, did she ever color my world. Thanks Jean, I love it. She picked my name again for the challenge next year! BTW, Jean is a wonderful photographer, you should check out her website. I wish she would post on her blog more often (hint, hint), but she's in the middle of remodeling her house (I know the feeling).

March 31, 2009

A Creative Weekend

I love the weekends. I usually get some free time to spend with my fiber friends, but this weekend was all play and not much work.
Fibervision had their monthly meeting on Saturday. The business meeting was pretty quick for a change. We had art talk, show & tell, a quick lunch and bead shopping at a store that is going out of business. I can understand why it's going out of business . . . this store has been open for one year, directly across the street from where we hold our meeting, and none of us ever knew it existed. Huh? How can that be? I saw a going out of business sale on Craigslist, so 12 of us piled into the shop. I'm sure she was as surprised as we were!


Here's my haul . . . there's several types of glass beads, a fused glass pendant, a cross section of some type of nut, semi-precious stone beads, copper bells and some funky happy face beads. How's that for an eclectic assortment?After the shopping, Lucilla led a fun workshop making a collage out of photos and text from magazines. It was a round robin format with only 2-1/2 minutes to work on each collage before it was passed on.

On Sunday, I went with three friends to the Glendale Quilt Show. I'm sure you're not too surprised that I found some items that I just had to purchase.This book really grabbed my attention and begged to come home with me. It has some interesting techniques that I hope to incorporate into one of my upcoming challenges. And look at these beautiful soy fibers. Silk fusion is a technique that I've been wanting to try for a while. One of the vendors had a kit that contained the silk fibers, textile medium and instructions. Her instruction said that The Ultimate glue works well for heavy duty uses, so I decided to buy a bottle and give it a try.

After the quilt show and lunch, it was onto a SAQA meeting in Brentwood (LA). It's the first informal meeting of this type that I've been to; but plans are underway to have one each quarter. It was a fun afternoon spent with some very talented artists. Lucky me!

March 21, 2009

Art Technique Fat Book

As promised, here are a few photos of my Art Technique fat book trade. The only technique rule was to use recycled or cheap household items. Originally, there were 120 participants, but a couple people didn't follow through with the commitment. I was quite impressed, it's difficult to get 118 people to do anything!
Personally, I think there are way too many pages to be a traditional book, so I decided to punch two holes and use loose binder rings to hold them together. Somebody else in the group put her pages into a box.On the left, Pat Upton uses alcohol to do an inkjet transfer. On the right, Karen Swiech has a little book in a recycled net pocket that describes how to paint the surface and make the book.Theresa Ross shows different ways to use hardware store washers. They are really pretty and surprisingly heavy.

On the left, Kathy Swift shows how to dye and layer tissue paper that ends up looking like leather. On the right, Martha Rose Bonds demonstrates how to use aluminum cans for embellishment.

There are a wide variety of techniques ranging from Homemade Alcohol Inks to Recycled Wine Bottle Screwcap embellishments. Definitely something for everyone and a wonderful resource for years to come.

March 20, 2009

One Step Forward, Two Steps Back

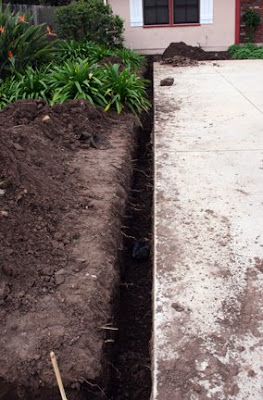
Just when you think you're done . . . SURPRISE . . . your main water line springs a leak! Fortunately, the leak was under the driveway, and you guessed it, under the newly planted garden. We had to dig up all the plants and dig a trench to the water valve, and decided to abandon the old water line. We dug a 60 foot trench that's 18 inches deep along the house, down the edge of the driveway, under the driveway, to the water valve and back up under the garden to the irrigation system. We discovered the leak on Tuesday. On Wednesday, it took 3 people six hours to dig the ditches. Thursday morning, the plumbers installed new pipes. Thursday evening we started refilling the ditches. I'm hoping that by Saturday, the plants will be back in the ground, the ditches will be filled and we'll be back to where we were a week ago. Sheesh!
Remember the Art Technique swap I told you about a couple of months ago? Well, I finally received my pages (if I remember correctly, 118 different techniques). They are amazing! I'm almost finished putting it together and will post some photos tomorrow.

March 18, 2009

More Thickened Dye Experiments

Here are the final two pieces I created during our Dye Day. I used another bath mat to create the repeating squares. It had a strong architectural feeling, so I decided to add to it with a thermofax of a building. At the moment, this is my favorite piece.
This piece was created by drawing lines across circles on a screen, letting it dry and then printing with different colors of dye. Do you like the circles on the white background? It seems like the contrast is too much, I think it may need to be overdyed.

March 15, 2009

Experiments with Thickened Dye

I had a really fun play day in Arroyo Grande with Andi and Rene. I love playing with friends as much now as I did when I was five! Playing . . . that's the perfect frame of mind, no expectations and lots of surprises. I finished five pieces of fabric, all but one are a fat half-yard; I'll share three of them with you today.This colorful piece uses a thermofax screen made from one of my photos, one of Rene's screens that have three squares, a screen of a splat, a BBQ pan with holes, and extruder drawn circles.I put a bath mat behind the silk screen and pulled yellow dye across the surface and let the screen dry. Once dry, I used clear paste for the first couple prints, then added turquoise dye.

I used a piece of construction fence behind the screen for this print. I wasn't happy with the way it was printing, the texture was very blotchy, probably because it was printed on canvas. Andi thought it looked like graffiti and suggested that I add writing. I put thickened dye into an extruder and added a layer of handwriting. I still don't like it much; it may need more layers.

Deconstructed screen printing is what Kerr Grabowski calls this technique. She has a DVD that explains all the steps. Both Rayna Gillman and Jane Dunnewold have instructions in their books.

I would love to hear from you if you've ever tried this. It's definitely a technique that is full of surprises. I really enjoy dyeing fabric a lot more than I ever expected. I think I'm going to have to buy some of my own.

March 11, 2009

Artist Trading Cards

For the first time in my life, I finished with an art project early! I stayed up late last Tuesday because I thought my ATC group met the following Wednesday, and of course, I hadn't finished my cards. Ha! I was wrong. I had to wait a full week to trade.
Here's some of the cards I created. The top left is a photo printed on fabric with painted bits. The other three are all screen printed on fabric with a little bit of embellishment.
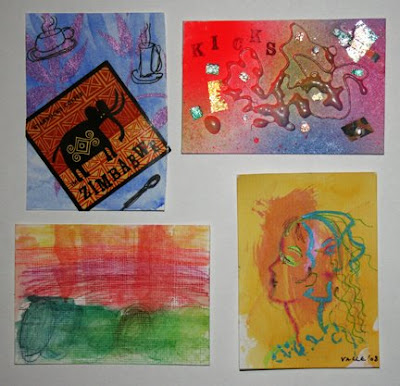
Here are some of the cards I received. Lucilla Warren created the one in the top row on the left. Below that is Madelaine Price who is 10 years old, and Mary Price (Madelaine's mom), has her card in the top row on the right. The bottom right card was made by Flavia Valle.
If you are a regular reader, you know that I belong to several online trading groups. They're fun, and I've received some beautiful items, but it just doesn't compare to meeting other artists face to face. If there aren't any groups in your area, maybe you could start one yourself. Our group is totally informal; we meet at the Good Cup Cafe and push some tables together. Anyone that shows up with cards can trade. If you want more info, send me an email.