
February 27, 2011

Bizarre Encounter in Cambria

A few weeks ago, Mike and I headed north to Cambria for a weekend getaway. We thought it would be a nice quiet weekend. Ha . . . we couldn't have been more wrong.
Every year, between December and March, North Beach in San Simeon (just above Cambria), becomes the breeding grounds for Elephant Seals. There is a boardwalk where people can view the seals from a safe distance and docents are present to answer questions.
The largest males weigh 5,000 pounds are are extremely dangerous. They continually challenge each other for breeding rights. The winner of each battle returns to the harem on the beach; the loser is forced to leave.
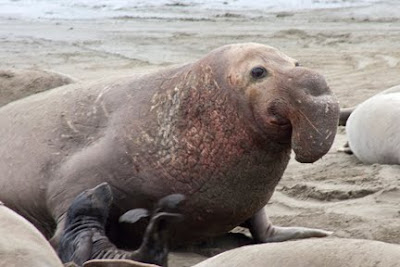
Their sounds were deafening! Click here to listen. Imagine hundreds of bulls fighting and honking, and mothers and babies screeching (bonding) at each other.
Each female gives birth to one infant, but some will let more than one nurse.
This was the largest baby on the beach, it looked as if it were ready to burst. I think it's safe to say that his mother didn't adopt other infants. Soon it will be on its own, and will need to learn how to fish. Until then, it will survive on the nourishment from the mom.
We spent a several hours watching, and photographing these amazing creatures. It was definitely worth the trip.

February 23, 2011

Tea Fire: Finishing Up

You've seen this piece right after I finished the top. It hung on my design wall, along with many others, waiting for quilting inspiration to hit, but it never hits. I know this. Why does it take me so long to start? Once I start quilting, it goes well enough. I don't understand why I have this block. Deadlines give me a reason to finish. Without deadlines, I would probably have a room filled with quilt tops.
Here's a photo of some of the quilting. I like quilting through two layers, front and batting. If you look real close you will see two vertical areas that aren't quilted as dense. Those areas will contain the final quilting lines.
After the majority of the quilting is finished, I attach a back, then I add the last
bit of quilting . . . just enough to hold the layers together.
This is what the same section looks like from the front. I'll be adding the back tonight and finishing up with the sleeve and label tomorrow night. Almost done with my third fire quilt.

February 21, 2011

Exhibit at the Faulkner Gallery East

You're all invited to our exhibit at the Faulkner Gallery in Santa Barbara. The opening is March 3rd, from 5:00 - 8:00 pm. This is also the same evening as our local gallery night, First Thursday. All the galleries and museums stay open late, so you can see quite a bit of art in a short period of time.
I'm so excited, and exhausted! Four of the twelve selected pieces for this exhibit have been finished in the past month. Actually, I'm still working on the final piece. Over 30 works will be on display throughout March, so stop on in. It will be a very diverse, colorful show with a variety of fiber art ranging from portraits to surface design.

February 19, 2011

Curve Piecing

Last week, I took a one day workshop with Jean Wells on curve piecing. Jean's technique is a little different than what I've done before, a little more liberated. She has some good tips for beginning art quilters on inspiration and color choices. It wasn't information that I really needed, because I find cracks in the sidewalk inspirational, but I like to hear how other people work. It's good information and a good technique to have in my toolbox.
Here's the little piece (8-1/2 x 11") I completed in the workshop. After this, I went on to experiment even more, testing how far you could push this method. I found the limit pretty quick.
The first seam/curve went smoothly (no pun intended). Even though I matched little dots along the curve, I still fell short 1/4" at the bottom (purple/black seam). The second curve completely pushed the limit of this method. I lost about 1-1/4" at the bottom of the piece (purple/green seam. Solution: cut the piece that is being added extra long and fake it, or make templates and add 1/4" seam allowances. Good information to know.
This book was written in 1988 by Marilyn Stothers, and is where I first learned about curved piecing. I used this technique in one of my quilts back in 2005.
All that 1/4" seam sewing made me realize that I don't piece much anymore. The majority of my recent work is either raw edge applique or painted or a combination of both. It's funny how major changes can happen gradually, and you don't fully realize how much has really changed until you take a good look back.

February 17, 2011

Bad Blogger!

I apologize for checking out and hope that someone out there is still interested in what I'm doing. I honestly don't know where the time goes.
This photo shows our latest work in the backyard.
We're picking all the grapefruit and then removing the tree. It's pretty sad, but necessary. Someone planted this tree right smack in the middle of the yard before we bought the house, and we've been living with it for the past 23 years. We want to install a large patio and the tree is in the way. I bet the yard will look huge after the tree is gone.
Several people from my Fibervision group brought different items to our meeting to experiment with and we had a fun play day together. There was clay, beads, paint, paintsticks, screens etc. Here are a couple of fabrics that I rubbed with paintsticks.
Remember the banana slicer I bought a while ago? I finally got around to using it for these rubbings. They look like sea slugs to me, but a friend had a very different vision and thought it was disgusting! I'm pretty sure that I'll never see fabric like this anywhere else.
I used ribbed shelf liner for this effect and I really like the way it turned out. I chose very happy colors that day, didn't I? Very spring like.
I'll have a 3 woman show during March with Jeanne Surber and Ranell Hansen. I'll have 4 new pieces and I'm almost done with the last one. Yeah! Stay tuned . . .

January 2, 2011

Inspiration Is Everywhere

It doesn't take too much to get me started. I'm surrounded by wonderful scenery, books and supplies. Regardless, I'm always looking for a new perspective . . . a challenge is always intriguing . . . almost impossible to resist.
I came across an online group last year called Fast Friday Fabric Challenge. They recently had an opening in membership and I was eager to play along. The Fabric Challenge part is fairly easy, it's the Fast Friday part I'm struggling with. I'm able to come up with a design, but no way can I complete the entire thing in one week. There just aren't enough hours in my day . . . full-time employment seems to get in the way!
Even if you don't join the group, you can get inspired by the general information about the challenge subject and links they provide. It's like a mini art lesson each month.
Below are photos of the pieces I've made along with the challenge name and number.
Challenge 49: Chiaroscuro - Tea Fire

Challenge 51: One Shape - Looking Up

Challenge 52: Color Field

December 31, 2010

Batting and Bags

Here are a few projects that I finished up in the last couple of weeks. My Fibervison group had a dye day using Rit liquid dye. A variety of items were dyed and over-dyed, fabric, lace and batting were the most popular. I dyed three different types of cotton batting: Warm & Natural, Soft Touch and Mountain Mist.
They all dyed equally as well, however, the rinsing was a little rough on the batting and a few thin spots developed. Mountain Mist was my least favorite going in to the experiment, but it held up the best. The papery outer layer protected it. A surprise was waiting for me when the Mountain Mist dried. One thickness of batting separated into two pieces.How cool is that? Two for the price of one! (The photo below shows the layers pulled apart.)
If you want to give this a try, we followed the directions in the Dec/Jan issue of Quilting Arts by Judy Coates Perez.
I made these shopping bags for my kids (grown adults really) for Christmas. Unfortunately, I forgot to take a photo of Jason's before he went home.
Sean likes anything abstract and the fabric for this bag was selected with that in mind.
Rachel's favorite color is orange. I figured this tropical fabric would make her happy . . . and it did.
Thanks for hanging out with me this year, it's been a lot of fun. I hope you all have a Happy and Healthy New Year!

December 15, 2010

Painted Fabric

This piece was painted with Dye-na-flow and scrunched until it was dry.This base of this fabric was screen-printed with construction fence under the screen. Once dry, the whole piece was painted with Dye-na-flow. The paint filled all the areas that weren't already painted. I didn't really like this piece until I added the final layer. You just never know.
The first layer was black textile paint through a thermofax screen, second layer was yellow Setacolor, the third layer was Dye-na-flow.
I grew up in MA where there are plenty of old apartment buildings and fire escapes, but there aren't many in Santa Barbara. This one is part of the historic Hotel Santa Barbara. This building is 3 stories high; the tallest in town is five stories. The building codes are very strict here, both size and style are scrutinized. It generally takes about 5 years to get a building permit. Patience and deep pockets are required.

December 12, 2010

Fun with Soy Wax

Here's my latest experiment with soy wax, Dye-na-flow and found objects. Each piece started with fabric that was previously colored in some way. I figured another layer of color couldn't hurt.
I hope you can see the waxed images that were stamped on the fabric. I used a pool noodle extender to make the largest circles, the medium circles were made with plastic thing that held a roll of paper. The smaller circles were thread spools and the smallest circles were made with the end of a dowel.This photo shows the piece with wet red, blue and purple paint. The wax will resist the paint and leave the original color showing.
Here's the final piece with all the wax removed. Very fun, lots of movement.
This piece uses the potato head masher and thread spools. I was really anxious to see how this piece turned out.
Orange, red and yellow paint was added. You can really see the wax impressions now.Dry fabric with wax removed. I love it! The colors are very happy.
I always put another piece of fabric underneath to catch any excess paint. No sense wasting good paint. Again, it's usually a piece that needs a little something.
Here's my final piece. I used the pool noodle and thread spools again. This time, I purposely cracked the wax to see what would happen.
Red paint added. You can see the red seeping into the cracks.
Here's the dry fabric with the wax removed. This is what happens when you start with a dark background. It's a bit moody, don't you think?
This was a lot of fun and easy too. I'm sure I will be doing more.

December 7, 2010

De ja vu?

If you've been following my blog for a while, you've already seen a similar photo of junk on my curb. We're at it again. This time we're landscaping the back yard. The first step in any landscaping project is removal and that's what we did here.
Those bags are filled with a 20 feet of bamboo roots. I think we got most of it, but we'll find out for sure in the next couple of months. The canes have been cut, stacked and taped into bundles for the trash men to haul away. Bamboo is so tough it breaks the chipper, so we can't recycle any part of it as green waste. Good riddance!
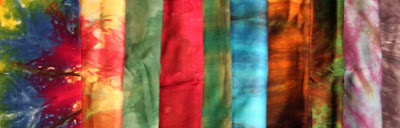
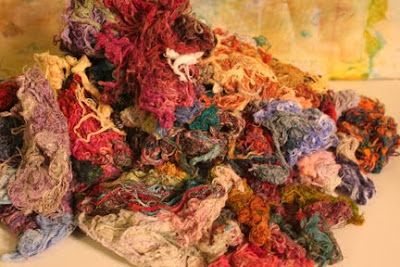
I've been having a lot of fun with dye, soy wax and paint. I'll take some photos and post them next time.

December 4, 2010

I'm So Lucky

I'm so lucky to be surrounded by supportive people. My family is always there for me, no matter what. My like-minded fiber friends feed my soul in a way that nobody else can. The Internet has allowed me to meet many wonderful artists that are willing to share their lives, work, ideas and techniques. It truly has become a very small world.
My friend, Linda, surprised me with a large bag at our last Fibervision meeting. Inside was a lot of hand-dyed fabric (over 5 yards) that she dyed herself. Beautiful, saturated colors, very moody and mysterious,
and a gallon Ziploc bag full of thread balls. OMG . . .what an impressive collection of thread balls.
My jaw dropped, I couldn't believe my good fortune. Only someone that knows me very well
would know that this messy pile would be a cherished gift!
I've been saving these ends from washed fabric for years and bet I have one of the largest collections in southern CA. I think I've posted photos of things I've made in the past. Here's one piece that uses a number of these knotted beauties.
I really love this piece, but don't own it any longer. I really should make more, it was a lot of fun to work on.
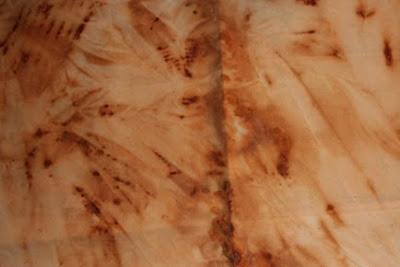
Here's another gift I received in the mail. I admired the rusted fabric Elizabeth was making and she was kind enough to sent me a beautiful piece.
A huge thank you to Linda and Elizabeth for their gifts and many thanks to all of you out there for all your support and comments. Keep them coming!

November 30, 2010

Things That Make Me Smile

I love this potato head potato masher. I think he's adorable . . . my husband thinks I'm crazy.
I haven't tried it yet, but I think he's going to make a great stamp for soy wax or fabric paint.
These whimsical paper clips are great too. Of course, I never use them as paper clips. I'll have to flatten them a little, but I think they will work great with sun-printing. Has anyone ever used them?
