May 10, 2007

Painted Fabric

As promised, here are a few of my favorite pieces of fabric that I painted yesterday. It was so much fun to make and I love the way it turned out.
I used 5 colors of transparent Setacolor, 2 yellows, green, blue-green and red, each diluted to a 50/50 mix of paint to water. I sprayed the fabric with water until it was damp, but not dripping wet. I used a clean foam brush for each color. I Laid the colors on from light to dark. The amount of paint you lay down in an area will determine the darkness. If you space the colors farther apart, they will blend together like a watercolor painting. Choose your colors carefully, or you could end up making yucky brown!
This piece has 2 yellows, green and blue-green. I placed washers on top as a resist.
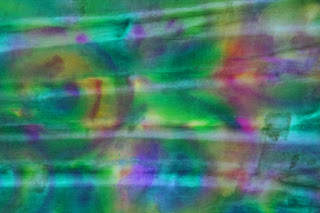
Circular shapes were painted using all five colors.

This piece was painted in bands with 2 yellows and the red.

May 9, 2007

The Perfect Day

I work late quite often and have many comp hours built up. So, I decided to take the day off today and do whatever I wanted. I didn't do any laundry or dishes; I didn't even make the bed! I spent the morning taking photos and this afternoon I painted a yard of white fabric I found when I cleaned my studio. Then I met with my ATC group and exchanged some great cards. Mike and I went to the beach and ate dinner. It was a perfect ending to The Perfect Day.
My next post will have photos of the fabric and cards.
Terri, from Stegart asked for a closer look at the flower quilt on my design wall. It isn't quite finished, but is very close. When I started this drawing, I was thinking of how nature appears to a small bug on the ground.

The background fabric was painted very lightly with dye-na-flow, then the flowers were painted using dye sticks and water soluble crayons. The background texture was created by rubbing dye sticks across the fabric with plastic canvas underneath. The bee and butterfly were embroidered on my Viking.

May 7, 2007

My Sewing Studio

Well, my studio was such a disorganized mess, it was long overdue for a good cleaning. I spent the last two days re-organizing everything. What a difference! It is so neat now, I can find everything instantly. I can't wait to get to work and mess it all up again. LOL

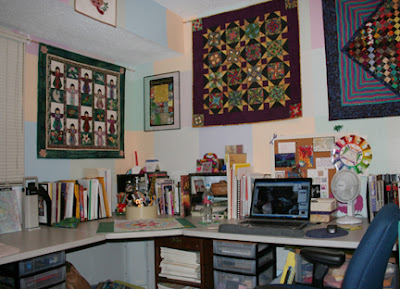
This is the area where I do most of the cutting and ironing. There is my beloved HP laptop. This was my Christmas gift from Mike. At the time, I didn't realize how much I would love it.

This is my main sewing machine, a Viking Designer I. I love, love, love this amazing machine, it doesn't just sew, it purrs its way through every project I take on. I have a flannel design wall hanging in front of the closet. Behind the curtain are many shelves with all sorts of fun materials waiting to play. Whenever I run across a good sale, I will buy several yards, and hang it on hangers in the closet. Not shown are quarter to half yard pieces, they are stored in drawers, sorted by color family.

This is my wall of fabric. One to two yard lengths are rolled up, tied and stored on end on these shelves. They are sorted by value, but I can see in this photo that a few pieces are out of place. Oh well, that will have to wait for another day!
April 29, 2007

New Blogger Heading

Just posted a new graphic heading on my blog. I couldn't find any instructions on what size it needed to be, so it was a matter of trial and error. It took four times to get the size correct. So, what do you think? Do you like it????

April 28, 2007

Friendship Mandala

I recently joined a Yahoo Group to discuss and explore the book The Artist's Muse by Betsy Dillard Stroud. Sue B and Joanna are the moderators of this talented group.
While everyone was waiting for their book to be arrive, we were given some general guidelines to use in creating our personal mandala. Generally mandalas contain a lot of symbolism and meaning to the maker.
We each chose a subject and explored our personal symbols and the meaning of colors to express our topic. My mandala, below, is based on friendship.


I am the small blue (loyal) circle in the center surrounded by the friendly (orange) circle. The pink (loving) open hands are a sign of welcoming. My friends are represented by the blue (loyal) stylized figures in the outer circle. The quilted spirals represent femininity and fertility. The yellow (happy) circles symbolize infinity, eternity. I have used circles in my artwork for many years, so the circular mandala was a very comfortable shape for me to work with. However, packing so much meaning into every section was quite the challenge.
I started with a bluish-yellow piece of hand-painted fabric for the background. I cut the hands out of organza with a hot pen tool which fused the edges. I laid them out to determine how large the circle needed to be. I then made a stencil out of freezer paper for the stylized figures. I used dye sticks throughout the piece. The red and yellow circles on the outside edge were made using tissue paper that releases its dye when wet.
The final piece was quilted. It measures 17" square.

You can view all the mandalas at http://webpages.charter.net/sbleiweiss/muse/mandalas.htm

April 26, 2007

Fun with Photos

I really enjoy photographing nature. It's always fun to play with Photoshop to see what happens. Sometimes, an interesting photo becomes spectacular with the help of a few filters.
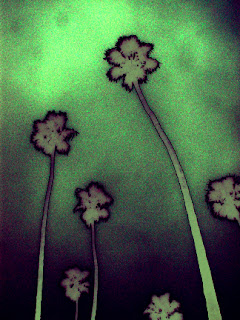
These palm trees were shot on a very cloudy day. It created a very moody, almost eerie feeling.

This is a photo of a flower on a Lily Tree. The flowers are around 12" long. I tried growing one in my yard but didn't have much luck.

This is a close-up of a Canna leaf. The colors and stripes are magnificent, I love them the way they are.

April 17, 2007

Baby Quilt Finished

Yeah! I finished the Once Upon A Time baby quilt. I barely finished it in time for Marcy's shower. So what else is new? I always seem to be working right up to the deadline. The quilt came out really cute and Marcy loved it, so what more can you ask for? It should prove to be a lot a fun for the whole family.
To begin, choose a starting square and follow one of the pathways, making up a story as you go. It sounds easy, but depending on which path you take, you may have to get really creative.
Rather than buying so many novelty fabrics, try swapping with a group of friends.

April 15, 2007

New ATC Group

This week has been a whirlwind! I got a lot accomplished and had some fun too!
One of the things I did was join an ATC Group. It meets one time per month at a local coffee shop to trade cards. Everyone was really nice and made me feel very welcome. There is an interactive ATC exhibit planned for later in the year. More news on that later. Several of my ATC's are directly below. They were painted on water color paper with the major shapes inked on top.
Here are the cards I received in exchange. There was a wide range of materials used. One was made from a brochure at the doctors office. Several were collages which used a combination of papers, magazine images, fiber, thread and ink. Some were completely painted, one was all fiber and one has been stamped and foiled. They are all wonderful and very unique.


April 1, 2007

Film Reel Design

My friend, Kathy, and I are organizing a Quilt Challenge for our guild. We chose "LIGHTS! CAMERA! ACTION" as the challenge topic. Kathy loves to write, and is reel-ly having fun with this. Anyways, somebody found an old film reel at a garage sale and thought we would be able to use it as a prop for our challenge.
I hadn't planned on starting a new quilt design, but when I saw the film reel, ideas started flowing and the next thing I knew, I was at my computer drawing the reel. I LOVE circles. I don't reel-ly understand why, but they seem to be in most of my quilts. And if one is good, more is better!
This will probably become a quilt at some point. I imagine the background as hand-dyed fabric and the reels will be organza or tulle. I think the overlapping of shapes will make some great secondary designs.

March 24, 2007

The Getty Museum


Mike and I drove to Los Angeles to visit the Getty Museum. It was built on the top of a tall mountain. You park your car at the bottom and take an electric tram to the top. Most of the art is very old; J. Paul Getty was not a fan of modern art. My favorite painting is Van Gough's Irises.

All of the buildings are made with stainless steel and coated with white paint or white Travertine clipped onto the steel. There is an abundance of glass everywhere. The result is a museum with very geometric lines and reflective surfaces.

The setting is fantastic; on a clear day, the 360 degree view is amazing. The weather was perfect for spending a lot of time in the gardens. The photo above is of a circular garden in the middle of water. The photo below is a shadow from a very unusual sundial in the garden.


I came home with a bit of a tan and totally exhausted from all of the walking. I took a lot of great photos. It was a wonderful way to spend a Friday.

March 19, 2007

Photo Sphere

A friend of mine wants to insert a photo into a sphere and distort the perspective. I played around in Illustrator for a little while and came up with the photo below. I like it. I think I need to spend a little more time exploring the possibilities. Hmmm . . . so many ideas, so little time.

March 18, 2007

Perfect Bindings by Machine

I'm tired of having to sew bindings down by hand. If I'm going to spend time stitching by hand, I want it to show!
A few months ago the search for the perfect machine binding began. Is there such a thing? If so, I haven't found it yet. I've tried several types, the quilts below are the best ones to date. Both are pretty good; but not quite good enough. Is it possible that my standards are too high? Maybe I just haven't done enough of either to be really good. I think I need to try a few more before I give up and sew the bindings on by hand. The quilt above doesn't actually have a separate binding. The back of the fabric was brought to the front, folded and mitered at the corners and sewn on with a straight stitch. It was pretty fast but it doesn't give the finished appearance I want.

This binding technique is the one that Ricky Timms uses on his quilts. I watched his Grande Finale video and decided to give it a try. I watched it two times, took notes, purchased a special foot, Pearle cotton and set to work. There is definitely a learning curve on this one. Mitering the corners are the hardest part.
I like the two colors on the binding. I think it adds a wonderful spark to the edge. Hopefully, the next one will be much quicker!