July 3, 2010

Family Vacation

We just got back from a fantastic vacation with our family. The first stop was IL for my daughter's graduation from Northwestern University. Every time I visit Chicago, I like it more. They have great galleries, restaurants, entertainment, friendly people and public transportation. Usually, we stay in Evanston, but this time we stayed in the River North area of Chicago. Here's the view from my hotel.
Can you see the giant frog sitting on the building across the street? It just about gave me a heart attack the first time I looked out the window. Freaky!This giant stainless steel sculpture is located in Millennium Park and is called Cloud Gate or the Bean. The way it reflects everything around it is fantastic, but the best part (IMHO) is inside the bean.Here it is. I'm underneath the bean looking up! How cool is that? Every person turns into an abstracted shape and is reflected many times. I took quite a few photos in here.There are two of these giant towers (40-50 feet) in the park. Each has a different face projected on it and the facial expressions constantly change. You stand there watching it, and the next thing you know, the mouth opens and water comes streaming out. It was a hot day, and the kids were having a great time playing in the water.
Two of my favorite art visits were to Vale Craft Gallery and Chiaroscuro. Everything is handcrafted and gorgeous. Definitely worth visiting.
My next post will feature NYC. Stay tuned!

June 13, 2010

New Jersey Housing Needed

I hope people from the Princeton, New Jersey area read my blog and can help.
My daughter is about to graduate from college in IL and has an intern position at EFT in Princeton, NJ. It's a wonderful opportunity that she couldn't pass up. The problem is, she can't find a place to live for the 2 months (July and August) she'll be there.
It sounds like the area includes very nice homes and Princeton student housing. It appears that not much else is available. The usual craigslist hunts aren't working.
If you have a room for rent or know of an apartment in that area, please contact me privately.

June 6, 2010

O-So Many Layers

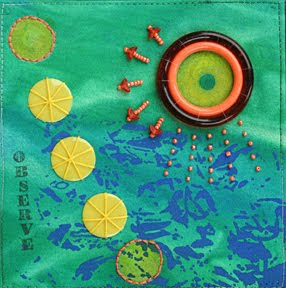
The Fibervision challenge is finally complete. Each panel features a piece of fabric that I made using a variety of surface design techniques (screen printing, sunprinting, dyeing, stamping).
The fabric was wrapped around a square of Timtex and stitched together. Each square is then stitched onto the painted canvas to form the letter "O". Each individual square also contains the letter "O" somewhere on its surface, in some cases, all over its surface.
A plastic bracelet was repurposed by wrapping it in translucent ribbon and stitching it to the Timtex. Screen printing, stamping and embroidery are the main techniques used in the square above.
The base of this piece was sunprinted with green and yellow setacolor and the blue was printed on top using a thermofax screen. The tiddlywinks were used to sunprint and then were stitched onto the surface.
Do you know where the inspiration for your art comes from? Generally, I'm not influenced by other artists work, however, this time, I remember seeing two wonderful pieces of art that influenced the layout of my piece. Perhaps I'm kidding myself, maybe I just don't realize how easily influenced I am. Hmmm . . . something to think about.
Take a look at Michelle's colorful piece. It has 9 mixed media squares on a fabric background. She combines recycled items, text and color in a very fun way.
The other inspirational piece was hanging in a local gallery and was made by Michelle y Williams. I instantly fell in love with it but my husband didn't. Unfortunately, the price tag required that both of us had to be in love with it. It is made from metal squares that have layers of paint and texture applied. Twenty five squares were nailed to a solid base to form a grid.
Are there any truly original ideas left? Probably not many.

June 2, 2010

Eat the Muffins and Repurpose the Packaging

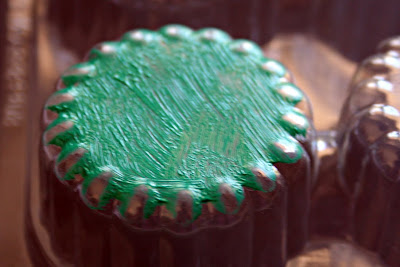
A group of friends were carpooling to the Southern CA SAQA meeting. I bought some mini blueberry muffins for the ride. While passing out the muffins, I noticed the great flower shape of the packaging. Hmmm . . . this could make a great print. After we returned home, I returned to the store to check out the larger muffins. Oooh, these are a different shape and look even more promising. I didn't need the muffins, but the packaging was irresistible.
I slathered the paint on and made some sample prints on paper. I think they have a lot of potential and have added them to my collection.
This just goes to show that great shapes are everywhere. Some of the favorite printing plates come from very simple packaging items. Have you ever looked at the packing tray that holds those tiny liquor filled chocolate bottles? They make great circles, one of my personal favorite shapes!
Keep your eyes open and let me know if you find something good!

May 28, 2010

LARGE Birthday Card

Arlene's birthday invitation came with a rubber nose, peanuts and a photo of her dressed as a clown. Is that funny or what? Arlene is the owner of The Magic Castle in Hollywood and that's where the party was held. She didn't want any presents - only cards. My first thought was, this better be a great card and I started to play. This is what I came up with.Four funny faces! I just love making these faces, they are sooo much fun! My friend Rene is responsible for getting me hooked on this. When I began, I had no idea what the faces would like, they just developed. To me, the faces ended up looking like a robot, a clown, a muppet and a martian. Do you agree or do you see something else?
Here's the back of the card before we signed it. Needless to say, Arlene loved the card. And yes, it was the largest (13" x 17") and most colorful card on the pin-up board. My DH made a wonderful envelope for the card. I'm really happy with the way it turned out.
The party was a blast and the magic is always amazing. If you ever get an invitation to visit the Castle, make sure you accept.

May 27, 2010

The Benefits of Water Soluble Crayons

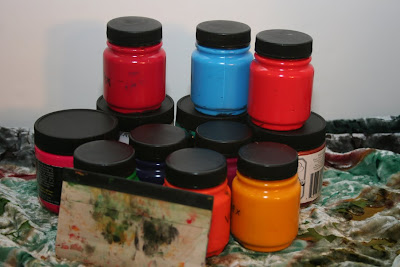
Rayna wondered why you would use Water Soluble Crayons instead of textile paint. Here are several reasons that I can think of. Clean up is much quicker, they are super easy to use, they are very compact for traveling, they don't change the hand of the fabric, and the most important reason of all is that I LOVE to experiment with new materials.
Twelve crayons in a compact tin.
Twelve jars of textile paint.
Don't get me wrong, I love textile paints and crayons won't replace my paint. Crayons are simply one more tool in my toolbox. I'll be traveling this summer, and crayons will be in my suitcase. You may find that crayons are exactly what you need for a particular situation. Options are good!

May 23, 2010

Printing with Water Soluble Crayons

If you are looking for a new way to add a layer of color, try water soluble crayons. They are easy to use, cleanup is a snap and they deliver great results. All you need is a thermofax screen, Jacquard extender and water soluble crayons.
Place a padded surface on your table, place the fabric with the pretty side up and put the thermofax on top. Color all over the screen with the water soluble crayons. If you want saturated colors, press hard while coloring to make sure a lot of crayon is applied. Add a line of extender across one edge of the screen, like you would if it were ink or paint and drag it across the entire screen. I used a bondo applicator tool from the car store, but the best tool depends on the surface you are working on.

This photo shows the fabric before it was printed (left), what the printed surface like as I peel the thermofax back (center) and the thermofax as it's being removed (right).
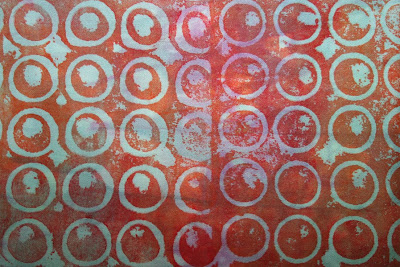
Here is a section of cloth that shows two pulls. You can use one solid color or mix and match whatever way you choose.
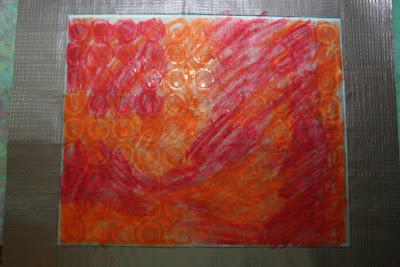
This piece shows the same design printed many times using different colors. I started printing with the lime green color, added some blue and printed, added some red and printed, and then I added some yellow and printed. Each additional color mixed with the color below it to create new colors. You should always work quickly and keep your screen good and wet. Fun experiment, great results!

May 9, 2010

Bendable BrightLight

Have you tried this new LED task light? Lucky me, I was able to use a 40% off coupon at our local craft store to buy it. The price is pretty high for such a little light, but it gives you a nice bright, white light, exactly where you need it.
See how it's attached to the left side of my sewing machine? The flexible shaft will adjust in any direction you want. If you need light in a different location, just pop the whole piece out of its holder. Be warned, this light does not run on batteries, you need an electrical outlet. I had some major rearranging to do to make one available. It's amazing how many electrical items I have in this studio! The only battery operated item I can think of is my clock.The photo below shows the normal light that comes from my sewing machine. As you can see, the light is yellowish and spreads across several inches.
The photo below shows you how the Brightlight is focused exactly where you want it. I also like it because it doesn't give off a lot of heat like some lamps I own.
It seems like the older my eyes get, the more light I need. If you're like me, you might want to give this light a try. BTW: I have no affiliation, I'm just a happy customer.

May 7, 2010

"Smoked Out" Returns Home

My quilt, "Smoked Out" has returned home safe and sound from its year on tour. I hope some of you had a chance to see it up close and personal in Long Beach, Houston or Chicago. Was anyone lucky enough to attend all three shows?
A year is a long time, but I'm thrilled that my quilt was chosen to be part of the Quilts Inc. West Coast Wonders Exhibit. It's obvious that Quilts Inc. took great care of my quilt and I'm very grateful. If you haven't seen the quilt, take a peek in the Gallery.
I've had laryngitis this week and haven't had much energy . . . it was the perfect time to work on little projects.
Hand felting is fun and the bright wool from Susan made me feel better. Everything about her makes me smile, including her crazy dreams!
Shape Splitting is another fun project. You begin with multiples of a shape and explore various ways to divide it up while maintaining the original shape. The leaf shape in the top left corner didn't quite line up as well as it could have. I think two of the pieces were glued in the wrong place. Oh well.

May 2, 2010

Self Control Isn't One of My Strong Points

I attended two quilt shows in two weeks, both were mostly traditional with a few innovative quilts sprinkled in. Last weekend was the Seven Sisters show and yesterday I went to the Camarillo show. I enjoy all types of quilts and have pieced my fair share of traditional patterns.
Shopping and inspiration are two things you're sure to find at a quilt show. I've been trying to curb my purchases, mainly because I'm running out of space to store the stuff, but I'm afraid self control isn't one of my strong points! Here's the damage.
One yard of each, most are batiks. I'm always in search of good blacks. I think the grey fabric will look great with some sparks of color added to it.
A large felting brush. I originally bought the smaller brush to try it out. I've discovered that I really enjoy it and need a larger surface. I had to have these large grommets. The vendor used them on handbags. I'm not sure what I'll use them for. A new silver paint stick and stencil brush.
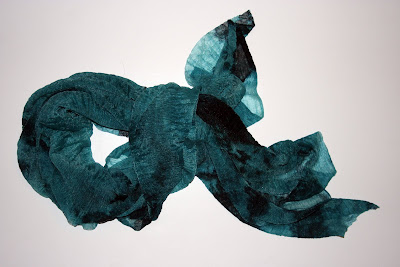
A beautiful scarf with lettuce edges. I like to wear scarves, but they make me so hot, I feel like I'm about to burst into flames! This one is so lightweight, even I can wear it. At least I hope I can, time will tell.
This is a photo from a book that I bought at Barnes and Nobles this past week. It's called Earth From Above. 366 Days by Yann Arthus-Bertrand. The images are from all over the world and are fabulous. Each photo includes the location and a description of what you're looking at. Some are quite abstract and you would never guess what it is. Examples: Colorful Bottle Racks in Germany, Slash & Burn Farming in Venezuela, Waste from a Uranium Mine in Niger.
The photo above is of ice skaters at Wollman Rink in Central Park in New York City. Earlier this week I watched a documentary about a Hawk called Pale Male that made NY and Central Park it's home. I'll be in MA in June, maybe a NY side trip is necessary. I've been to the museums, Radio City Music Hall, shopping, etc., but I didn't make it to Central Park. Is it worth the trip?

Enhancing the Surface with Layers of Color

The base fabric was painted with Dye-na-flow, when it was dry, water soluble crayons were applied through two different thermofax screens. I didn't care for the way it was developing . . . it looked too pretty. I decided to put it away for a couple of weeks.
When these new permanent markers arrived, I had to test them. I added a layer of writing to the surface. Interesting, but I didn't want the writing to be the focus. Now what?
It's too monochromatic, it needed some intense color. Circles were added with permanent markers and Tsukineko ink. Better . . . but too bright.
I decided to integrate the layers by glazing with two colors of Jacquard Textile Paint. I applied the paint to the entire surface with a dry sponge. The glaze knocked the intensity down a notch.
A subtle change, but much better.

April 25, 2010

Still Stitching and Embellishing

As you can see from the photo below, I'm still stitching and embellishing. This mat and metal trays help control my beads. If you spill a container of beads, you'll be picking them up for the next 2 years. Not much fun! Do you have specific tools that make your beading easier?
Here's the final square for the letter "O" challenge. I didn't finish in time for the Fibervision meeting, but I faked it pretty well. Each square was attached to the canvas with two applique pins. My first attempt with blue tape attached to the back didn't work because the squares were too heavy. Once I finish the embellishment on this square, I'll stitch them all to the canvas background.
Everyone loved my piece and thought it would make a great sample for teaching surface design. I tend to underestimate the amount of information I have and think that everyone knows what I know. My friends keep telling me that it's not true, I have a lot to share and should teach. Teaching is something I would like to do, but at this point in my life, I don't have enough hours in my day.
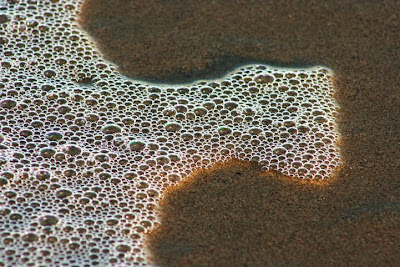
I love the texture in this sea foam along the beach. I use circular or pebble quilting quite often and find that the size variation of the bubbles is what makes it interesting. I recently saw a quilt where all of the bubbles were the same size and I didn't care for the way it looked. IMHO, Size does matter! LOL