
This was an experiment. I managed to change the look of the fabric, but I don't think it was necessarily an improvement.

It started with a piece of dyed fabric that had some type of Chinese characters stamped on it. I didn't create the fabric and I didn't care for it. I wanted to improve it with some layers of paint.
I pinned the fabric to my print board, and wrapped ribbon around the pins to create a grid of sorts. I screen-printed the large circles using a Photo EZ screen, and stamped the smaller circles. The ugly background fabric continued to show through.

Once the paint was dry, I removed the ribbon to see if the ribbon resist created much of an impact. It's noticeable, but not too impressive. Oh well! Sometimes, the best lessons are learned when the experiment doesn't go as planned. Some things can't/shouldn't be saved.

Fortunately, the next painting project is an improvement. As you can see, progress was made on the patio covers. Looks nice and neat, doesn't it? Unfortunately, it didn't last very long.

This is what it looks like today. A mess! These 2" x 2" pieces of wood need a layer of primer, then 2 layers of red paint. There are 4 tables full of these wood pieces, that's over 120 pieces that need 3 coats of paint! Sheesh, we spent all weekend painting and still need to spend one more day to finish the painting. By the time we finish, we'll have two nice shady areas on the patio. We definitely need somewhere to escape from the CA sun.
 It seems like I find great line and texture everywhere I look. I couldn't resist capturing the cross grain of this stack of wood.
  Here's a peak at some pieces I recently added to my design wall. I bought an
 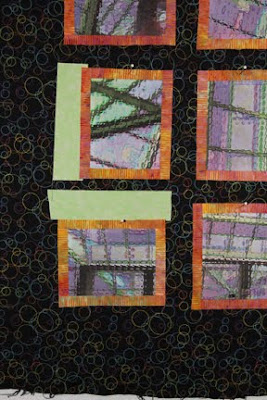 Not quite sure where it's going yet, but it's evolving. Stay tuned.
 Here they are, hormones in their hot flash mode! A fair amount of tulle was used throughout to force color changes. The whole section through the middle has a layer of tulle, and the circles are also cut from tulle. Some of the tulle is blue, some maroon. Some areas have very dense stitching and that created an uneven surface. It was a challenge to get it to lie flat, but I did it with careful stitching in strategic areas, and lots of steam!
  Here's a detail shot where you can see the cheesecloth that I used to create the diagonal lines. I love the texture of cheesecloth, and it's so easy to mold into any shape you want. You should give it a try it next time you need a special texture.


