
 One Trick or Treater said, "Bloody Fingers Build Character"; he grabbed a handful and ran!!
October 31, 2008
Gummy Body Parts
Here's one of my Halloween offerings, "Gummy Body Parts". Ewwww . . . . that was my reaction as I put them into my shopping cart. No chance of me eating the leftovers, that makes this the Perfect Candy. One Trick or Treater said, "Bloody Fingers Build Character"; he grabbed a handful and ran!!
One Trick or Treater said, "Bloody Fingers Build Character"; he grabbed a handful and ran!!
October 28, 2008
More Stamp Carving & Fabric Printing
I'm back . . . Here's the second installment of my stamp carving and fabric printing experiments. The first two photos show the carved stamp and the printed fabric made with that stamp.
 I used Neopaque paint to print the stamps in an all over design and let it dry.
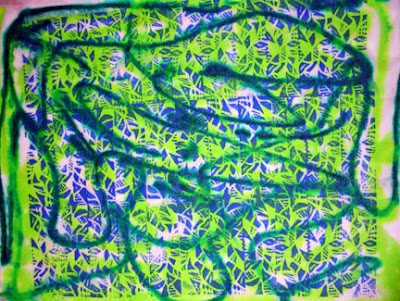 I layered this batch a little differently than the last one. I put a white piece of fabric down first, then layered the blue printed fabric face up. I sprayed it with water and squirted apple green and blue Dyna-flow on top.
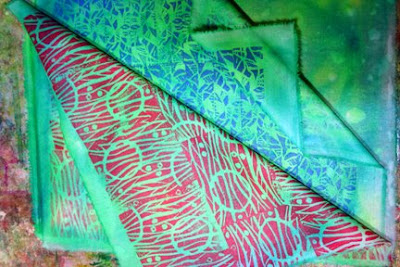 Then I added the red printed fabric face down and squished. Here's a photo of the stack when it was still wet. This is a great way to add a bit of background color to white fabric. I'll show you the final outcome in the next post.
The first two photos show the carved stamp and the printed fabric made with that stamp. I used Neopaque paint to print the stamps in an all over design and let it dry.I layered this batch a little differently than the last one. I put a white piece of fabric down first, then layered the blue printed fabric face up. I sprayed it with water and squirted apple green and blue Dyna-flow on top.Then I added the red printed fabric face down and squished. Here's a photo of the stack when it was still wet. This is a great way to add a bit of background color to white fabric. I'll show you the final outcome in the next post.
October 27, 2008
Stamp Carving and Fabric Printing
I led the Fibervision design workshop this month. It was loosely based on Jane Dunnewold's book Finding Your Own Visual Language. A creative group of artists really doesn't require much in the way of instruction. Place materials in front of them, give them a general idea and off they go. Everyone enjoyed carving their own stamps; some used Exacto Knives, some used carving tools.  I used Jacquard Neopaque to print my stamps on cotton fabric. After drying for a couple of days and heat setting, I began to play with the printed fabric.
I used Jacquard Neopaque to print my stamps on cotton fabric. After drying for a couple of days and heat setting, I began to play with the printed fabric. This was pretty good, but it needed a little something.
  Hmmm . . . Apple Green and Red should do the trick! It was pretty juicy again, so I added another layer of fabric and squished.
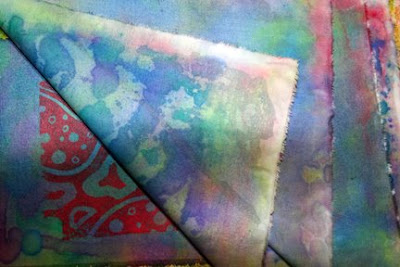
I couldn't wait to see what it looked like, so I peeled back the layers and took this photo. I can't wait for it to dry! I also painted two other pieces that I'll show in the next post.
October 24, 2008
More Fabric!
What can I say? I'm weak and I know it! I know . . . I always say my studio is ready to explode, but yet, I cram more in. The trip to Pacific International provided lots of opportunity to buy beautiful things. I was pretty good, but couldn't resist everything. This first photo has some purchases from a store in San Jose that Ellen Anne Eddy recommended called Fabrics R Us. If you like fabrics that stretch, shimmer and shine, this is the store for you! Actually, they have two other stores in the same mall, one has upholstery fabric and the other had and odd mix of stuff. I bought the lime green ultrasuede and three types of silk, and some plain white canvas fabric that is waiting for some paint. The three fabrics on the right came from PIQF.
 This is a sampler pack from Cherrywood Fabric. Cherrywood is the only solid fabric I ever buy. Well, I suppose that isn't completely true. I buy white to paint and dye and black to discharge. Anyways, if you've never seen their fabric before, you're missing out. It's all hand dyed and has a beautiful, suede like finish to it. Each piece is around 8 x 10" and there are a zillion colors.
I also bought some white on white fabric to paint and two patterns which I forgot to take a photo of. One is a Quiltcoat by Tabitha Quilts and the other is a Bellino Bag by Ghee's. I seem to collect patterns but never make anything! I'm sure I'm not alone . . . please, tell me I'm not alone!
This first photo has some purchases from a store in San Jose that Ellen Anne Eddy recommended called Fabrics R Us. If you like fabrics that stretch, shimmer and shine, this is the store for you! Actually, they have two other stores in the same mall, one has upholstery fabric and the other had and odd mix of stuff. I bought the lime green ultrasuede and three types of silk, and some plain white canvas fabric that is waiting for some paint. The three fabrics on the right came from PIQF.This is a sampler pack from Cherrywood Fabric. Cherrywood is the only solid fabric I ever buy. Well, I suppose that isn't completely true. I buy white to paint and dye and black to discharge. Anyways, if you've never seen their fabric before, you're missing out. It's all hand dyed and has a beautiful, suede like finish to it. Each piece is around 8 x 10" and there are a zillion colors.I also bought some white on white fabric to paint and two patterns which I forgot to take a photo of. One is a Quiltcoat by Tabitha Quilts and the other is a Bellino Bag by Ghee's. I seem to collect patterns but never make anything! I'm sure I'm not alone . . . please, tell me I'm not alone!
October 17, 2008
Design Exercises
I'm off to Pacific International Quilt Show in Santa Clara for 3 days. I thought I would leave you with a fun design exercise to try. Last month, Jeanne Surber, shared this exercise with our Fibervision group. It's an exercise that I find very useful and have been doing for years. Cut a hole out of an index card, I have 4 different sizes that I use. Move it over a magazine page, fabric, etc. until you see a composition that you like. Jeanne traces the design, but I have a hard time seeing the details through the tracing paper, so I just draw what I see.
 Turn each one around to see if a different orientation looks better. Choose a composition that you like and develop in whatever way suites your style.
Sorry about the photo quality, I'm in a rush . . . I need to get ready for our road trip. Yeah!
Cut a hole out of an index card, I have 4 different sizes that I use. Move it over a magazine page, fabric, etc. until you see a composition that you like. Jeanne traces the design, but I have a hard time seeing the details through the tracing paper, so I just draw what I see.Turn each one around to see if a different orientation looks better. Choose a composition that you like and develop in whatever way suites your style.Sorry about the photo quality, I'm in a rush . . . I need to get ready for our road trip. Yeah!
October 12, 2008
Photo Manipulation
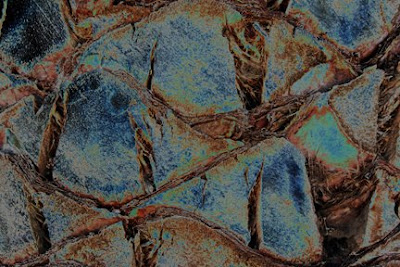
After a full day of gardening, I needed a break. I decided to play with Photoshop. The image that I started with is very different that what I ended up with. I thought you would be interested in seeing the progress. This is a close-up of the bark of a palm tree.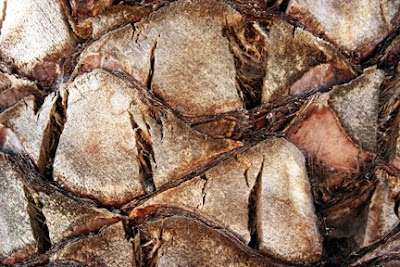 This is the original photo with a little contrast added.
 I wanted to change the color dramatically, so I decided to solarized it.
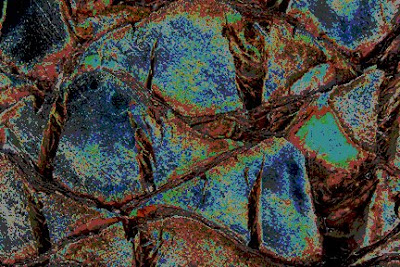 Next, I posterized it at a setting of 5. It didn't change it too much, but it added a lot of depth.
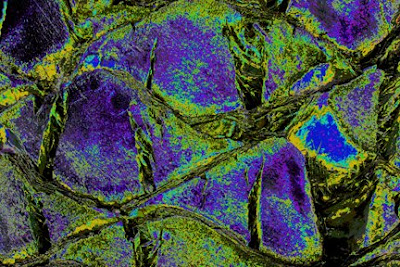 Here I've changed the colors by changing the master saturation to +60, the hue to +52 and the lightness to 0.
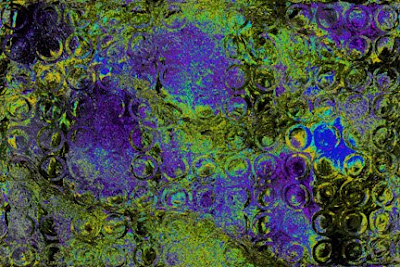 I've decided to displace a photo of circles. The horizontal and vertical setting was 70. The displacement map was stretch to fit and the undefined areas are wrap around. I like how the circles added texture to the large areas, but it's a little too obvious.
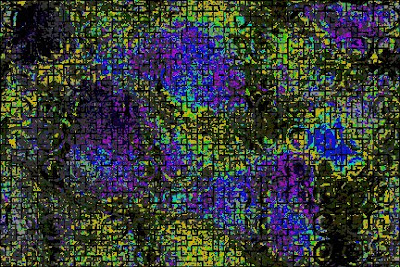 So, I added a tile filter. The number of tiles was 50, the offset was 20% and the background color was black. It knocked the circle back a bit and added another layer of texture. I like it, so I'll stop here.
Photoshop is a lot of fun. The more you play with the tools, the better you will understand what they do. Just remember to rename all your changes and Save As.
Image how surprised I would be if I opened the palm tree bark photo and found the altered image above!
 This is the original photo with a little contrast added.
 I wanted to change the color dramatically, so I decided to solarized it.Next, I posterized it at a setting of 5. It didn't change it too much, but it added a lot of depth.Here I've changed the colors by changing the master saturation to +60, the hue to +52 and the lightness to 0.I've decided to displace a photo of circles. The horizontal and vertical setting was 70. The displacement map was stretch to fit and the undefined areas are wrap around. I like how the circles added texture to the large areas, but it's a little too obvious.So, I added a tile filter. The number of tiles was 50, the offset was 20% and the background color was black. It knocked the circle back a bit and added another layer of texture. I like it, so I'll stop here.
Photoshop is a lot of fun. The more you play with the tools, the better you will understand what they do. Just remember to rename all your changes and Save As.
Image how surprised I would be if I opened the palm tree bark photo and found the altered image above!
October 11, 2008
Pyramid Pazzazz
I watched Kathy Rose piece zillions of colorful triangles together. She seemed to have a plan, but I didn't know what the intended outcome was. When I'm not making the quilt, I kind of like the final surprise. This quilt top was on my bed as we auditioned the inner border and I saw it again after it was quilted.  I wasn't prepared for how different it looked hanging vertical on the wall. When it was flat, I hadn't noticed the plaid design, the triangles within triangles, the diamonds,, the hexagons, etc. Every time I look at it, I see different shapes! The colors are gorgeous and the color values were handled beautifully. Great job, Kathy!
I wasn't prepared for how different it looked hanging vertical on the wall. When it was flat, I hadn't noticed the plaid design, the triangles within triangles, the diamonds,, the hexagons, etc. Every time I look at it, I see different shapes! The colors are gorgeous and the color values were handled beautifully. Great job, Kathy!Here's a close up of Pyramid Pazzazz. Kathy added the misspelled Pazzazz in honor of the musical I worked on earlier in the year. It took Second Place in the Large Traditional Pieced, Commercially Quilted category. Nancy King from Santa Barbara Quilting is responsible for the beautiful all over quilting. Here's our next project. Not quite so beautiful, huh? I didn't really get the "before" photo. All the Juniper bushes have already been removed. Those itchy bushes should have been removed 20 years ago! All you can see in this photo are the stumps. Yeah!
 We also removed the Veronica bushes along the curve. We still need to remove all the dead grass/weeds. We ended up with 55 trash bags full of green waste.
Now I've got to come up with a design. Something that incorporates curved paths, drought tolerant plants and pretty colors. My husband thinks planting a garden is like designing a quilt. Do you think they are similar?
October 10, 2008
Go with the Flow
Joanna requested some close-ups of my Go with the Flow quilt that won the blue ribbon.
This quilt was made for a Fibervision exhibit at the Big Sky Cafe in San Luis Obispo. The theme that we chose was Blue, but as usual, I had a hard time sticking to the rules. The blues were too cool; it needed some spark, so I added a bit of pink and purple to warm it up.
This quilt was made for a Fibervision exhibit at the Big Sky Cafe in San Luis Obispo. The theme that we chose was Blue, but as usual, I had a hard time sticking to the rules. The blues were too cool; it needed some spark, so I added a bit of pink and purple to warm it up.
This is a close-up of the middle section. The pink semi-circle is Angelina fibers. The blue vertical strips on the right have been sewn together with the raw edges exposed. Hopefully, you can see some of the hand stitching in the vertical Tye-dyed section and in the diagonal lines in the middle. The top left section has a grid of pintucks.
Here you can see the beading in the smaller machine appliqued circles. This line of beading continues throughout the whole spiral.
October 9, 2008
Harvest of Colors Weekend
It seems like I'm always rushing from one place to another, barely one step ahead of the next deadline. I like to stay busy; but lately, it's been a bit too busy. I'm hoping that the next couple of months will be a little quieter.
The Coastal Quilters Guild held their quilt show this past weekend and I'm happy to say, that one of my quilts won a blue ribbon.
Ranell, one of my Fibervision friends, won Best of Show for her series of Wild Women. This is the first time that our traditional guild awarded Best of Show to an art quilt. It's a definite milestone. Way to go Ranell. My good friend Kathy also won second place for her beautiful quilt. I'll ask her if I can show a photo.
Ellen Anne Eddy was the featured artist. If you've never seen her work before, you should definitely check her website. I spent a fair amount of time with her over the weekend and found her to be a very kind and sharing person. Whenever a child came into her booth to look at all the colorful thread and angelina, she would ask them if they quilted. They would chat about their projects, then Ellen would tell them to choose a half yard of hand-dyed fabric as a gift. She gave them a business card and asked them to send her a photo of whatever they made. How cool is that?
And no quilt show is complete without lots of vendors! It seems like I always manage to spend some money. My poor studio is going to burst soon!
oooooh . . . . look at this neon fabric. Do you think I was in a happy mood that day?
The Fabric Art Workshop book is full of techniques, my kind of fun! Ellen highly recommended the Quilt Halo for doing embroidery work and quilting. She said it saves a tremendous amount of time because she doesn't have to keep re-hooping the fabric. So I just had to have it. And Ellen's book shows how she finishes the edges of her quilts with satin stitching.
That's it for today . . . off to my Dreamweaver class.
October 3, 2008
Smoked Out
A few posts ago, I offered a close up of my latest fire inspired quilt "Smoked Out". I didn't want to post the full image until the exhibit was hanging. The show at the Cabrillo Pavilion Arts Center has been hung and is open to the public, so now I can share my quilt with you. Don't forget about the reception on October 7th, 5:30 - 7:30pm. The background is a hand-painted piece of fabric. The mountains, clouds and sun were formed using layers of tulle and the raw edged flames are made from organza and commercial cottons.
The background is a hand-painted piece of fabric. The mountains, clouds and sun were formed using layers of tulle and the raw edged flames are made from organza and commercial cottons.I'm really pleased with the results and have been getting some great feedback. I'm pretty sure that I have at least one more fire quilt left in me.
If you're a regular reader, I'm sure you will recall the Gap Fire and the trauma surrounding it. Well, the effects of the fire are still being felt; but now the problem is flooding. All five watersheds have been burned, which means the chance of major flooding is extremely high. Planes and helicopters are dropping 200 loads of hydromulch per day, 7 days a week, for the next two months. I feel confident that they are doing everything possible to prepare for winter. Let's hope it's enough!
October 2, 2008
Studios Magazine
My fabric wall can be seen in the newest Studios Magazine! Page 8 features a short blurb and a photo of my fabric storage. I am number 2 of the 85 ways to find, sort & store your stash. For those of you that haven't seen my extensive fabric stash before, you can see it here.
As expected, I'm thrilled to be included in this magazine, but I wish they would have spelled my name correctly (RYS). At least they got the blog address right!
It's pretty interesting to see the variety of artists studios. Amazing art is created everywhere from closet sized spaces to super organized studios. If you wait for the perfect time and space, you might never create anything. So make do!
Subscribe to:
Posts
(
Atom
)


