March 21, 2011

Beauty before the Storm

It's so peaceful to roam around the garden, looking for the prettiest flower, and the best angle to photograph it.
A Camellia bud getting ready to burst.

Beautiful Lilacs, a rare sight in Santa Barbara.

Brilliant Clivia's are happy in their new home under the orange tree.

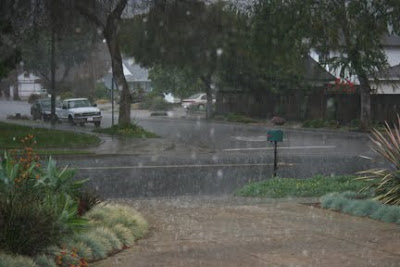
All was well . . . and then a late season storm hit hard. 7" of rain in 24 hours! Fortunately, it has stopped for a while, but more rain is expected tomorrow. The ground has been completely saturated, flash floods warnings were issued, and the risk of mudslides is pretty high. I hope the next storm takes a different route and lets us dry out a bit.

March 17, 2011

Can this Scarf Be Saved??

Unfortunately, my opinion is NO. I know, I spent a lot time knitting this much, but I just have to accept the fact that it's a failure, and rip those stitches out.
It's one of those yarns that have six wonderful (so I thought) yarns on one skein. It looked so beautiful, I just had to make a scarf. How can something so pretty turn ugly so fast? The gauge of every yarn is different and the scarf ended up getting fat and skinny with every yarn change. Some of the yarn is fuzzy like mohair, some is metallic and slender, some nubby and it's all different thicknesses. Somebody told me that I could block it, but they said that sight unseen. I stopped at the Ball & Skein yarn shop in Cambria and saw a scarf knitted with similar yarn, and asked them about it. They said to use size 11 needles, but I'm currently using size 10, so I think 13 might be better. I need advice from any knitters out there.
While I was at the yarn shop, I saw this beautiful yarn, and had to buy it. It came with a free lacy pattern and the owner showed me how to do it. Unfortunately, by the time I got home, I forgot how to do it. Yarn over and knit 2 stitches together. Huh? I couldn't get my needles through 2 stitches no matter how hard I tried.
Honestly, I'm really not good a knitting, but for some strange reason, I continue to torture myself by trying to knit. Every time I begin a project, I have to watch videos on the internet to re-learn how to do it. Then, I start knitting and ripping the project apart at least 6 times. Finally, I figured it out, and I LOVE how it looks.
It would have been a lot faster to crochet it. Hmm . . . buying a scarf would have been really easy. Sometimes, I wish I wasn't so stubborn!

March 15, 2011

Exhibit Opening

Here are some photos of our exhibit at the Faulkner Gallery. Hanging the show turned out to be pretty easy because we met before the exhibit and figured out how the work from 3 different artists would blend together best. In the end, I think we did a great job. This photo was taken right after we finished hanging it.
Ranell forgot to bring one of her pieces (empty space on the right) and she added the title "Conceptualize, Create, Communicate" on the far wall, later in the day. I managed to remember to take a couple of photos during the reception. We had a great turnout and we received wonderful feedback. The most exciting part was that many people had never seen fiber art like this. They were really excited about our work and had many wonderful questions. Here is a photo of Rafael Perea de la Cabada (right), a Santa Barbara artist, and teacher. He's a great source of inspiration and will give me honest feedback about my work. I really appreciate his input.
I also have two pieces hanging in an exhibit at the Jewish Center in Santa Barbara.

March 13, 2011

Soy Wax Results

The paint has cured, the fabric was soaked in hot water and then ironed to release all traces of wax. Here are the results:
Fabric #1: I used a foam stamp for the grid and a cork for the circles.
Fabric #1: Layers of wax and paint

Fabric #1: Wax removed

Fabric #2: I used a foam stamp for the flowers
Fabric #2: Layers of wax and paint

Fabric #2: Wax removed

Fabric #3: I used a metal whisk to stamp the swirls.
The fabric looked identical with and without the wax layer. I suspect that because metal is a better conductor of heat, it made a clearer impression on the fabric. This was the final piece, so it's also possible that the wax was warmer.
If you are patient, and let the paint cure for 2 weeks before you remove the wax, very little paint will wash out. Next time, I'll use Dye-na-flow paint instead of Setacolor.
Lots of fun! If you decide to try this, I would love to see the results.

March 8, 2011

Soy Wax Workshop

I have an electric wok that wasn't hot enough for stir frying, but it's perfect for soy wax. I also have a little melt pot and Anne has a crock pot filled with soy wax too. I have tons of stamps, spatulas and found objects that are perfect for stamping.
What is all this for? A soy wax workshop with my Fibervision friends. I gave them the basic information about soy wax and off they went. They grabbed some fabric and tools and got busy.
There are little things you learn along the way about the different tools, but there is very little that can really go wrong. This group doesn't want or need many directions. Even if I told them exactly what to do, they would do whatever they wanted anyways! That's why I LOVE this group!
I really don't like starting with white fabric, so I dunked it into very diluted setacolor (before the meeting) and set it outside to dry. Here's one of the pieces drying in the sun.
This is what it looked like after it was dry. Much better than white.
This is my collection of kitchen tools that I use for stamping. It's amazing how many different mashers you will find once you become aware of them.
Xandra had some pieces that she painted in a different workshop. She brought them along to add a layer of wax and more paint. It looks like she really likes the swirly whisk.
Here's the fabric after a setacolor dunk. Kind of cool!
Here's the same piece after I took a mono print of the surface of my board. Don't you love it?
I'll have more before/after photos to share once my paint has cured.