Showing posts with label dye-na-flow paint. Show all posts

May 30, 2013

Sunprinted Fabric

Last weekend, my Fibervision group decided to have a sunprinting play day. I used Dye-na-flow paint instead of the usual Setacolor. I've found that both work equally as well, so use whatever you have on hand. There was a fourth piece which was more subtle than these, but one of my good friends admired it, so I gave it to her.
 I feel like I'm in an airplane looking down on the scenery.
 Love the jewel tones.
I will never have too many circles.

One of the questions in my FV group was "How do you know when a piece of fabric is finished?" Honestly, I don't think there is one answer that will be right for everyone. Some people might think that my first layer is over the top! I believe that if you follow your gut instinct you will generally make the right decision for you. How do you decide when to stop?

March 13, 2011

Soy Wax Results

The paint has cured, the fabric was soaked in hot water and then ironed to release all traces of wax. Here are the results:
Fabric #1: I used a foam stamp for the grid and a cork for the circles.
Fabric #1: Layers of wax and paint

Fabric #1: Wax removed

Fabric #2: I used a foam stamp for the flowers
Fabric #2: Layers of wax and paint

Fabric #2: Wax removed

Fabric #3: I used a metal whisk to stamp the swirls.
The fabric looked identical with and without the wax layer. I suspect that because metal is a better conductor of heat, it made a clearer impression on the fabric. This was the final piece, so it's also possible that the wax was warmer.
If you are patient, and let the paint cure for 2 weeks before you remove the wax, very little paint will wash out. Next time, I'll use Dye-na-flow paint instead of Setacolor.
Lots of fun! If you decide to try this, I would love to see the results.

December 12, 2010

Fun with Soy Wax

Here's my latest experiment with soy wax, Dye-na-flow and found objects. Each piece started with fabric that was previously colored in some way. I figured another layer of color couldn't hurt.
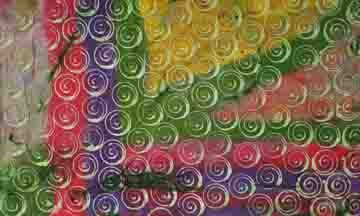
I hope you can see the waxed images that were stamped on the fabric. I used a pool noodle extender to make the largest circles, the medium circles were made with plastic thing that held a roll of paper. The smaller circles were thread spools and the smallest circles were made with the end of a dowel.This photo shows the piece with wet red, blue and purple paint. The wax will resist the paint and leave the original color showing.
Here's the final piece with all the wax removed. Very fun, lots of movement.
This piece uses the potato head masher and thread spools. I was really anxious to see how this piece turned out.
Orange, red and yellow paint was added. You can really see the wax impressions now.Dry fabric with wax removed. I love it! The colors are very happy.
I always put another piece of fabric underneath to catch any excess paint. No sense wasting good paint. Again, it's usually a piece that needs a little something.
Here's my final piece. I used the pool noodle and thread spools again. This time, I purposely cracked the wax to see what would happen.
Red paint added. You can see the red seeping into the cracks.
Here's the dry fabric with the wax removed. This is what happens when you start with a dark background. It's a bit moody, don't you think?
This was a lot of fun and easy too. I'm sure I will be doing more.