Showing posts with label hand painted fabric. Show all posts

April 24, 2011

Three's a Charm

This small piece is the third in a series, hence the title, "Three's a Charm".
If you're interested, you can see the other two pieces in the Art Gallery section. If you look closely, you'll see that they share some of the same characteristics. The reason is that the fabric was stacked in five vertical layers and paint was added to different layers. Depending on the type of paint used, some of it penetrated through several layers and some didn't penetrate at all. After it was dry, additional layers were added to enhance each piece.
The painted fabric and batting were machine stitched, then the beads were added. I painted a canvas for the background and hand stitched the finished piece through the canvas. The inner piece is 8 1/2 x 11" and the canvas is 11 x 14".
FYI: That white border is the batting.

September 7, 2010

Which Background Do You Like Best?

If you're like me, you pull a zillion fabrics out of your stash, and one by one, you put them on your design wall, and by the time you get to #30, you can't remember what any of them look like. Sound familiar?
If I think there is any possibility of a fabric working, I take a photo. For some reason, looking at the choices on the computer really helps in the decision process. Does it takes the emotion out of the decision? I'm not sure, but it works for me.
Here are some backgrounds that I chose for the "Hormones" piece I showed previously. I would love to hear your opinion, good or bad. Maybe you hate them all.

Number 1
Number 2
Number 3
Number 4
All of the backgrounds are either hand-painted or hand-dyed by me.

January 11, 2010

UFO or WIP?

I love it when people leave a comment. It's nice to know somebody is actually reading my blog. There were several comments about (UFO's) UnFinished Objects! It seems like everyone has them . . . the difference is their attitude about them. Some refer to them as Works in Progress (WIP). To me a WIP is different than a UFO. If it's on my design board, it's a WIP. If I lose interest and it comes off my board, it's a UFO. Out of sight - out of mind. Once that happens, I'm ready to move on to something else and I have a difficult time going backwards. And that applies to everything. I can't even do a back dive or roller skate backwards! Sad but true!
Here's a photo of one of my design boards. It's the typical wall insulation covered in felt. WIP's, inspiring pieces of fabric, comics, photos & quotes are among some of the things found there. The piece in top right corner is a hand-painted piece of fabric that has lots of inspiring shapes. The bottom left is a WIP that uses a photo made into a thermofax and then printed, an abstracted photo that was printed on fabric, hand-painted fabric, deconstructed screen printed fabric and commercial fabric. Quite a mix. The bottom right is screen printed fabric that's waiting to be made into a bag. The top left is a quilt made by a friend. It's amazing how good it looks with my own work.Here's the same design board a few days later. The WIP in the bottom left has changed quite a bit, but it's still not finished.
Here are two more UFO's. Both are completely finished tops, well constructed, interesting to look at, approximately 40-45" square. Why are they unfinished? I don't know. I love circles . . . that in itself should be enough to get me to finish them. The top one is completely pieced, the bottom one is machine appliqued.

Patty Ashworth has a system that might help get these projects finished. One year she made a resolution to finish one project a month before she could start anything else. It worked for her . . . It might work for you. Anybody game?

November 28, 2009

One of a Kind Shopping Bags

My husband and I have decided to be more friendly to the environment. It started by filtering our own water and using a metal water bottle, and then progressed to reusable shopping bags. I really didn't want a bag that said Trader Joe's. I decided to use some of my hand-dyed, painted and screened fabric to make a shopping bag that was truly one of a kind.
I started with a set of instructions that was fairly simple and proceeded to change everything about it. I think the only thing that remained the same was the length of the webbing used on the strap! I kept coming up with a better way to do it . . . I just can't help myself. In the end, it's still pretty simple, but the way it goes together makes a lot more sense (at least to me).
Here's the first bag I made using hand dyed denim on the outside. The interior has a beautiful batik.
Once my husband saw the fabric combination below, he decided he would also like a special shopping bag. The fabric on the left is a commercial fabric, the fabric on the right was sunprinted, then it was printed using a thermofax screen.

Here's the finished bag. I'm happy to say that Mike loves it!

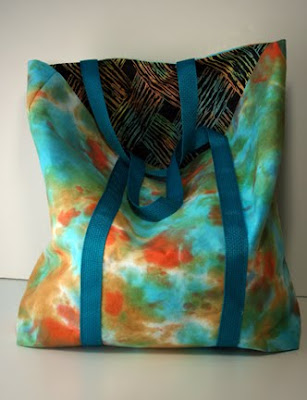
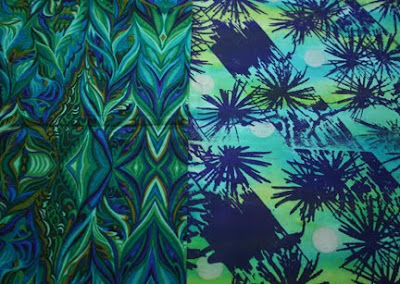
This is the fabric combination for the next bag. The purple is a commercial fabric and will be used for the lining. The fabric on the right was screenprinted using blue glue on a screen. Once the denim was dry, I added color in some of the squiggles with Dye-na-flow.

Hope those participating enjoyed their Thanksgiving celebration. Two of my three kids came home for a short visit. Although our dinner was delicious, it definitely wasn't traditional. Somehow, all three of my kids turned into vegetarians. One will eat dairy products, one will eat dairy and fish and one is vegan. We decided to have Macadamia nut encrusted Halibut with grilled tofu, home made applesauce, carrot salad, grilled asparagus and stuffing! Everyone was happy and it was wonderful to spend some time together. What more can you ask for?

November 8, 2008

Giveaway

I've been waiting patiently for the 100th country to visit my blog. Well, it finally happened on election day! It was quite the historic day for the USA and my blog. Now it's time to celebrate this memorable occasion with (2) Giveaway Prizes of 100 items from my stash.

There's a variety of buttons, paperclips, beads, shells, wrapped sticks, hand carved stamps, a bead tray, several types of cording, dyed, painted, screenprinted and discharged fabric . Two lucky people will receive a package similar to the one above.

All you have to do to WIN is leave a note. I'll randomly select two names on November 15th. Good Luck!

July 13, 2008

Colorful Weekend

I'm taking full advantage of the extra time I'm spending indoors and it's been a colorful weekend. Fortunately, the real Gap Fire is 80% contained, however, the fire living inside my head has spread to my design wall. For the background, I'm using a piece of fabric that I've painted. It has several layers of tulle and organza throughout with another layer of blue tulle on top of all the mountains and flames. It's still in pieces, but I'm getting pretty close to the final design.
I can't decide which fabric to use for the palm tree and border. Do you have a preference? Or maybe, you have a completely different suggestion. Let me know what you think.


The photo above would use a green palm tree to go along with the greenish/red foreground (left side of photo)This photo above shows a purple palm tree to go along with the purplish foreground (bottom right of photo).

January 6, 2008

More Painted Fabric

Here are the results of another painting session with Setacolor and salt. The first photo shows the newly painted surface, the second photo shows the dry fabric 4 hours later. I am still experimenting but really like what is happening so far. It's pretty amazing how much variety you can get from four colors of paint!This super bright combination uses Vermillon, Light Green and Buttercup. This piece is approximately 20 x 20".This combination is Light Green, Buttercup and Parma Violet. This measures 22 x 36".This combination is Cobalt Blue, Parma Violet and Vermillon. This piece also measures 22 x 36". My husband and I have designed a super quick and easy technique to stretch the fabric on frames (no more thumb tacks for me). So now I have 2 large frames and 2 small frames. That should keep me out of trouble for a while!

November 27, 2007

More Painted Fabric

Can you believe that I have more painted fabric to share with you? Once I got started, it was so much fun, I couldn't stop. Warning: Before you do this, cover your area with paper or plastic.This first piece is completely covered in Lumiere. It is quite shiny and stiff like paper. You need to work fairly quick for this technique. This piece was painted with a 50/50 mix of Setacolor and water. I used two blues and one red. After the fabric was painted, I added some creases for texture. I sprayed another piece of fabric with water and placed it directly on top of the wet paint. I pressed the fabric down and rubbed gently in places. The top fabric absorbed some of the color and resulted in a softer version. This next piece was a new technique for me and I'm sure I'll do it regularly. You will need Elmer's Gel Glue, a foam stamp, fabric and paint. I used a 50/50 mix of Setacolor and water, two blues and one yellow. This photo is showing you what the fabric looks like after it has been completely stamped with the glue. I used a foam brush to spread the glue and added more glue between impressions. Be careful not to add too much glue though, you will loose the details. This shot is showing how it looked as I started to add color. The flowers magically appear as soon as the color is applied. Make sure to choose colors that will blend well.Here's the piece completely covered in wet paint. It was much darker than I had hoped and I thought that I had ruined it. But the paint actually continued to mix together and it lightened considerably as it dried. The stamp became more pronounced as the fabric dried. It ended up looking like a beautiful batik!
I also ran six sheets of treated cotton through my inkjet printer with wonderful results. I'm not going to show those though, I have to leave something as a surprise! Now I have so many beautiful fabrics, I'm not sure which ones I want to trade with my Fibervision group.

November 23, 2007

Painted Fabric

It's been a very exciting week. Lots of new work in progress. I've been having fun playing with paint. Here are a couple of the pieces I've finished for the Fibervsion Christmas Exchange:

This piece is a commercial fabric that had white on white roses. I bought it with the intention of painting it. It has 3 layers of different paints. Some areas are highlighted with metallic Lumiere.This began as a plain white pfd fabric. I applied metallic Lumiere to the cross section of pool noodle and stamped the large circles. I then stamped with sponge and a rubber stamp. Once dry, the metallic paint acts as a resist. I wet the fabric and applied green, blue and yellow Dye-na-flow all over. I sprinkled salt on top and added another wet layer of fabric on top and squished it all together. The top fabric picks up the excess paint and leaves you with a pretty soft pastel version of the base layer.

I removed the excess paint from my sponge and bottles with this piece of fabric. It didn't take too long for me to notice the wonderful colors and textures developing. I finished the piece by rubbing and scraping both transparent and opaque paint onto the surface and then used stamps to add additional texture.

It was actually painted in this horizontal orientation, but I flipped it around 9o degrees counter clockwise and loved the composition. I instantly saw a landscape and decided to add a palm tree that was left over from another project.

What do you think? Should I continue with my landscape vision or chop it up and use it as fabric?

This piece actually began quite a while ago. It was two silk-screened prints side by side. I decided to embellish it with more paint and texture and blend it to create one long piece. all the shapes are outlined with Lumiere.

ELVERHOJ MUSEUM: The reception was a lot of fun. It was so exciting to see our work hanging in such a fantastic venue. It truly looks amazing. I was very proud of all of us. I am very thankful to be part of such a talented and friendly group of artists. I sold one wall piece during the reception and quite a few postcards. Pieces of the Past (posted on Aug 19th), will have a new home in January. Fortunately, I know the new owner, so I've been granted visitation rights! LOL Cathi, I hope you enjoy the piece as much as I enjoyed making it!

May 10, 2007

Painted Fabric

As promised, here are a few of my favorite pieces of fabric that I painted yesterday. It was so much fun to make and I love the way it turned out.
I used 5 colors of transparent Setacolor, 2 yellows, green, blue-green and red, each diluted to a 50/50 mix of paint to water. I sprayed the fabric with water until it was damp, but not dripping wet. I used a clean foam brush for each color. I Laid the colors on from light to dark. The amount of paint you lay down in an area will determine the darkness. If you space the colors farther apart, they will blend together like a watercolor painting. Choose your colors carefully, or you could end up making yucky brown!
This piece has 2 yellows, green and blue-green. I placed washers on top as a resist.

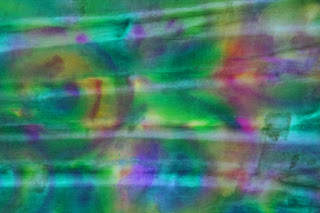
Circular shapes were painted using all five colors.

This piece was painted in bands with 2 yellows and the red.

May 9, 2007

The Perfect Day

I work late quite often and have many comp hours built up. So, I decided to take the day off today and do whatever I wanted. I didn't do any laundry or dishes; I didn't even make the bed! I spent the morning taking photos and this afternoon I painted a yard of white fabric I found when I cleaned my studio. Then I met with my ATC group and exchanged some great cards. Mike and I went to the beach and ate dinner. It was a perfect ending to The Perfect Day.
My next post will have photos of the fabric and cards.
Terri, from Stegart asked for a closer look at the flower quilt on my design wall. It isn't quite finished, but is very close. When I started this drawing, I was thinking of how nature appears to a small bug on the ground.

The background fabric was painted very lightly with dye-na-flow, then the flowers were painted using dye sticks and water soluble crayons. The background texture was created by rubbing dye sticks across the fabric with plastic canvas underneath. The bee and butterfly were embroidered on my Viking.

April 28, 2007

Friendship Mandala

I recently joined a Yahoo Group to discuss and explore the book The Artist's Muse by Betsy Dillard Stroud. Sue B and Joanna are the moderators of this talented group.
While everyone was waiting for their book to be arrive, we were given some general guidelines to use in creating our personal mandala. Generally mandalas contain a lot of symbolism and meaning to the maker.
We each chose a subject and explored our personal symbols and the meaning of colors to express our topic. My mandala, below, is based on friendship.


I am the small blue (loyal) circle in the center surrounded by the friendly (orange) circle. The pink (loving) open hands are a sign of welcoming. My friends are represented by the blue (loyal) stylized figures in the outer circle. The quilted spirals represent femininity and fertility. The yellow (happy) circles symbolize infinity, eternity. I have used circles in my artwork for many years, so the circular mandala was a very comfortable shape for me to work with. However, packing so much meaning into every section was quite the challenge.
I started with a bluish-yellow piece of hand-painted fabric for the background. I cut the hands out of organza with a hot pen tool which fused the edges. I laid them out to determine how large the circle needed to be. I then made a stencil out of freezer paper for the stylized figures. I used dye sticks throughout the piece. The red and yellow circles on the outside edge were made using tissue paper that releases its dye when wet.
The final piece was quilted. It measures 17" square.

You can view all the mandalas at http://webpages.charter.net/sbleiweiss/muse/mandalas.htm

February 25, 2007

Finished Quilts

I love it when I finish one quilt; three quilts in a couple of weeks is amazing! OK, they're all pretty small, but still they're done. The best part is I really like them all.

"Branching Out" was made using my hand-painted fabric in the large central square and the yellow stripe. The turquoise rectangle is discharged and the turquoise square is stamped. The rest is commercial fabric.


"Winter Wonderland" is made using all commercial fabrics. It was inspired by a black and white photo of trees covered in snow.

"Spring Has Sprung III" was made using using all hand-painted fabric that I created. The background is sun-printed, the trees are discharged and the flowers are painted.

February 9, 2007

Fiber Postcards

Here are some of the postcards that I have created. They are a lot of fun to create because you can try many different techniques in a short period of time.


This background is sun-painted and stamped with metallic paint. The foreground has silk flowers foil centers and silk leaves.

This was painted with dyna-flow and lumiere paint. the center spots are foil.


The background is hand painted. The foreground has free-motion lace, yarn and a piece of avocado bag sewn down.


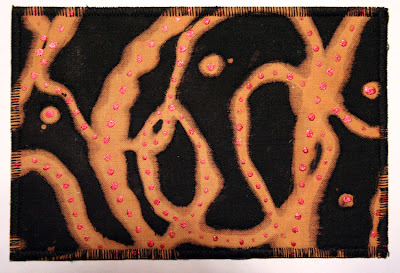
The beige design has been discharged using a bleach pen. Red foil dots were applied.

January 14, 2007

Play Day #2

Day 2 of Rayna's workshop was very fun and productive. All the design exercises were fairly quick, which meant you couldn't over analyze any of your choices. She also wanted you to use fabric that we painted the first day. Here are the four pieces that I designed. It was a great class, I would highly recommend it to anyone that wants to make original designs.